Showing posts with label high fashion. Show all posts

Wednesday, February 16, 2011

will you still be mine?


I wish I could have shown these photos last week prior to Valentine's Day, but that would have ruined the surprise for my seven sisters at our John 3:16 party on Friday night!!  However, for those who missed, enjoy the silly photo;

When I heard ♥J say she was going to be throwing her John 3:16 party this year, I knew I had to do something really fun to get into the spirit (even though Mr Valentine and I are not pink puffy heart in love with the holiday).  I had grand plans about dressing up all out in Valentine's outfits.  Luckily my husband was just as excited as I was willing to go along!

we hopped on over to our nearest Salvo and found him a pair of saweet red pants for $2.99!  I had some red fabric lying around and some extra lace, and about 30 minutes later I had a simple but cute skirt that was screaming out in the holiday spirit. The sunglasses were $3 at JoAnns (meaning our whole outfits came to just 6 bucks!). Mr Valentine's outfit wouldn't have been complete without a pink crochet bow tie though! (just whipped it up without a pattern because I'm awesome like that, hahaha!)


We were just the hit we were hoping to be!  Anyone else go all out for Valentine's Day this year (besides ♥J hehe)?

Tuesday, January 25, 2011

No Sew Tutu

My hubbs is making our daughter a cauteee free standing dress up closet (from ana-white) for her birthday. I get to do the fun part of finding the wardrobe. My first adventure was a super easy no sew tutu.


Materials:
Ribbon (enough to fit around your little girls waist, plus 50 inches)
aprox. 6 yards of tulle, in assorted colors
scissors
measuring tape


STEP ONE: Cut tulle into 4-inch strips.
Tip: The easiest way is to roll the entire length of your fabric (like a roll of wrapping paper) and then just cut every 4 inches.

*For short tutu's like the one that I made, you need to cut each 4-inch strip in half. If you prefer a long tutu, you can leave the 4-inch strip as is.


STEP TWO: Fold strip of tulle in half and loop around your ribbon. (I did six strips of each color before switching colors.

pull tightly to secure the loop.

STEP THREE: Once all your fabric is attached to the ribbon... tie knots on either side to prevent shifting. (Make sure you leave enough ribbon to tie a bow.)

Once all the fabric has been added and your knots are secure, you are done :)


Time to have your little girl dance around the room and enjoy! :)

"Greater love hath no man than this,
that a man lay down his life for his friends."
John 15:13


Monday, November 22, 2010

Giving Thanks: Girls Pilgrim Bonnet Tutorial


I just love love love stitch witchery. As I have said before I have no sewing skills whatsoever. Someday I would absolutely love to learn, but as for right now I'll have to stick with my fabulous stitch witchery.


Little L spent a wonderful day with her Aunt S yesterday. They spent the day playing fashion designer!!! How Fun!!! Little L drew a picture of a dress that she wanted to wear, picked out the fabric from Aunt S's fabric collection, and then patiently waited while Aunt S sewed it all together for her. (Without even having a pattern for a dress... props to Aunt S!!!) Little L couldn't have been more thrilled. It turned out looking like an adorable pilgrim dress. Which was perfect because Little L had her Thanksgiving party today at preschool. When Little L got home from Aunt S's yesterday I thought it would be so cute if she had a little pilgrim bonnet to match. However, I didn't have the right size paper to make her a paper bonnet. I did however, have leftover fabric that matched the kind S used. The only problem is I can't sew, but I did have stitch witchery. Problem solved!! From start to finish this fun project only took me 18 minutes to complete.

To begin:

First measure your fabric and make cuts as shown
(I cut my fabric a little bigger to make room for the hem, see below )


Once the edges are all hemmed advance to the next step.


Once it is secured the two folds will be connected to each other with the stitch witchery


After folding the bottom up fold it back down again to form a band so that the front side of the fabric is facing you. See below.


Once completed hot glue ribbon into place and viola project complete


*Tip for using stitch witchery: Make sure your iron is really really hot and your towel is pretty damp, it is all the hot steam that activates the stitch witchery. You'll know if your iron isn't hot enough or your cloth isn't damp enough because the stitch witchery won't turn into a glue and stick.

Wednesday, October 27, 2010

rings and things

I've been on a mission lately to clean out my closet and jewelry. As I went through my things, I found a lot of old rings and (before you get grossed out, I cleaned them!) toe rings!

Now, I'm not a big toe-ring wearer anymore as I was in my college flip-flop-through-the-winter years, but I decided to get creative, and use some free-spirit thinking to jazz up those rings into some new things!

Here's what you need:

(note: if you have something like really strong krazy glue or gorilla that's even better, these rings wont be for hard labor or anything)

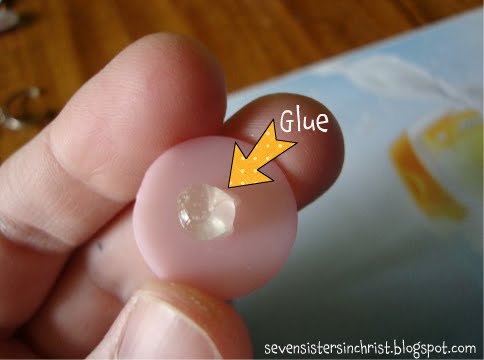
Put a dab of glue on the ring or the found item. This picture below is a pretty pink button!


I also found a pretty purple rock (I am an infamous trinket hoarder). I was worried it might be too big, but with enough glue, I think I got it to stick!


Update: After wearing, I got it wet, and it came apart- so I re-glued with some stronger craft glue, and got that rock to stick!


Voila! 4 new rings to add to my jewelry collection! I used a button, a googly eye (perfect for Halloween!), a tiny bouquet of blue flowers, and a pretty purple stone (Jenn, can your hubby identify it?)


Behold, as I model the rings;


Perhaps I'll begin a ring collection a la Madeleine Albright and use them to display my mood. What's that? They already make mood rings? Fine.

Happy crafting!! Get creative free spirits!!
Not a free spirit? Buy similar rings here and here!

Wednesday, October 13, 2010

little black dress? check. ray bans? check. holiday runway party? begin.

Who else is already thinking Christmas? I am already on a good start to my gift buying and just this past weekend found the cutest dress to wear to my husband's work Christmas party. On sale no less! There's something that I find so much fun about holiday parties with everyone dressed up, a fun dinner planned, a night of dancing, driving home late as the first few snowflakes of the night start falling... it can all be very magical!

In honor of my love for Christmas parties and holiday cheer, I've decided to throw a very high fashion holiday runway party right here at Seven Sisters! Let's just pretend it's December for today! Since I know none of my sisters planned for this, I went ahead and browsed around one of my favorite places to look at dresses (etsy!) and found some stunners for ya'll to wear to my party.

velvet dress black/gold heel gold peacock clutch tassel earrings
I'll start things off down the holiday party runway (which I imagine is covered in fake glitter snow with glitter snowflakes hanging from the ceiling and thick gold curtains as a backdrop.) I'll be wearing velvet. Yes, I know- many of you are wondering if velvet got stuck in a steel encased prison in the 80's. Not so. Velvet is making a comeback and I'll be wearing it to the party. Try to keep your eyes off the sash, I know it's shiny. Also, how fun are tassel earrings? You'll also notice I have a small thing for peacock feathers.
MJ arrives! Now, I know she's usually not this on time for the blog, but she's a new mom so we let it slide ;). hehe. I picked a blue dress for MJ, it's quite stunning and classic, just like her. It makes me want to go out and find a big white cape with a fur-lined hood to add to it. And what's this? MJ brought those caramel cookies I love. She's passing them out during her runway walk. So sweet.
Queue the holiday music as the curtain rises on Nel and Lulu, back to back with arms crossed- a little holiday attitude has arrived on stage. I love this dress, it's like Jackie O meets more awesome. And a polka dot clutch?! Nel, you're a statement maker.
I have to say, this dress is my absolute favorite. You can't see from this picture, but it even has pockets, hence the reason Lulu only needs a cute little coin purse! And I even found a jingle bell anklet on etsy! How awesome is that? She's in tune with the music on her way down the runway! I can hear the Mayor giving a standing ovation from the sidelines.
gold dress clutch shoes
We all know Mar is a fashionista, so I picked out a fashionable and high class gold dress for her! Naturally, she would have crocheted her own clutch, and the shoes- the shoes! After them, she didn't need much more accessorizing! Just don't trip on the catwalk!
It's J's turn down the runway, and I'm not sure what makes this outfit more...the boots, or the clutch or the beaded necklace. I like em all. Now out to the runway J or no water! ;)
purple dress black booties tweed clutch black tights pearl cluster earrings
Entering the runway in true dramatic fashion, it's Jenn in an unexpected ensemble. (Jenn, don't be mad. I put you in a sweater dress. You really did look so awesome in that purple sweater dress you tried on last weekend!) With some cute booties to boot, and who can resist a little tweed around the holidays?

And what would any runway party be without a gentleman?

We'll let the Marshmallow wrap up the runway walk, I think his photo pretty much speaks for itself. He's got the paparazzi all over him.

Ok, girls- now it's honesty time!

Are you wearing your dress? Stealing someone else's? What dish are you bringing to the party?

Not a sister? You're still invited! Post a link to your favorite etsy holiday dress!

Thank you all for humoring me and letting me waste a bunch of time putting together holiday party outfits from etsy and then calling it a blog runway party and forcing you down a figurative catwalk ;). I had a lot of fun keeping myself busy with this! Like Mar said below, Christmas will be here before we know it, and I can't wait- time off of work to just relax, time to spend time with family and friends, and just feel refreshed with some quality fellowship!

Wednesday, October 6, 2010

scrappy Gap shirt

My mother in law got me a very fashionable and comfortable Gap tee this year for my birthday. Unfortunately, I snagged it on something and ended up with two little holes, right in the front! You can dress me up but you can't take me out....


Not cool.


I really like this shirt. It fits me well and is awesomely comfortable. The holes were getting bigger every time I wore it. I was sad that it might go to waste. I considered trying to sew the holes together, however the fabric of the shirt is too delicate for that to last.

My other plan was a cute little heart patch. The only problem is, it would land directly on my belly button! Not very grown up...

I decided to expand the heart patch idea and use some felt fabric scraps I had leftover in my craft desk. I scrounged around for some various lids (milk, bell jar, heavy cream) and started tracing and cutting!


Once I had tons of little circles, and a few hearts, I laid my pattern out on the shirt.


Once I had everything arranged just so, I started sewing together the doubled up patches. See exhibit A below:


And this is what the shirt looked like once those pieces were all sewn together!


The last part was the most time consuming. I took the patches off and laid the pattern out next to the shirt while I sewed the pieces on one at a time.

But, check out the result! Cute, huh?! And this little transformation only took me an hour fifteen and cost nada dollars!


This project would be great for older kids too, teaching them how to sew. They can update a plain old t-shirt into something personalized and just their style.

In case you're curious, yes, I'm wearing my new scrappy Gap shirt as I type this. :)

Also, the hubs' response to whether he liked it or not was, "it's very YOU." So I call this craft: Project Success.

:)

Related Posts with Thumbnails